Spring Cloud Config自动刷新机制
Spring Cloud Config自动刷新的主要流程
目录
Spring Cloud Config的小坑
本文是基于spring-cloud-netflix 1.4.0.RELEASE版本
在做demo时遇到了个不大不小的坑: Spring Cloud Config 的客户端的配置文件不能用”application.yml”而需要改为”bootstrap.yml”,否则即便你所有的参数都配对了,你在使用@Value注入配置时也会抛出Could not resolve placeholder···异常。
关于git
为何spring cloud config会使用git作为存储配置的仓库呢?我想有以下几个考虑点:
- git自带版本控制
- git自带的branch可以用来支持配置中心的多环境(比如dev,test)
- git自带回滚功能
- git除了key:value之外还可以存储文件
但是也由于Git本身没有事件通知机制所以需要依赖mq来通知各个客户端(而且也只是通知说有配置更新,还需要一次网络交互才能获取到新配置)。总而言之使用git可以带来一些便利,但是也增加了架构的复杂度(需要多一个mq中间件,这也是很多人诟病它的一点吧?)
自动刷新配置
流程:
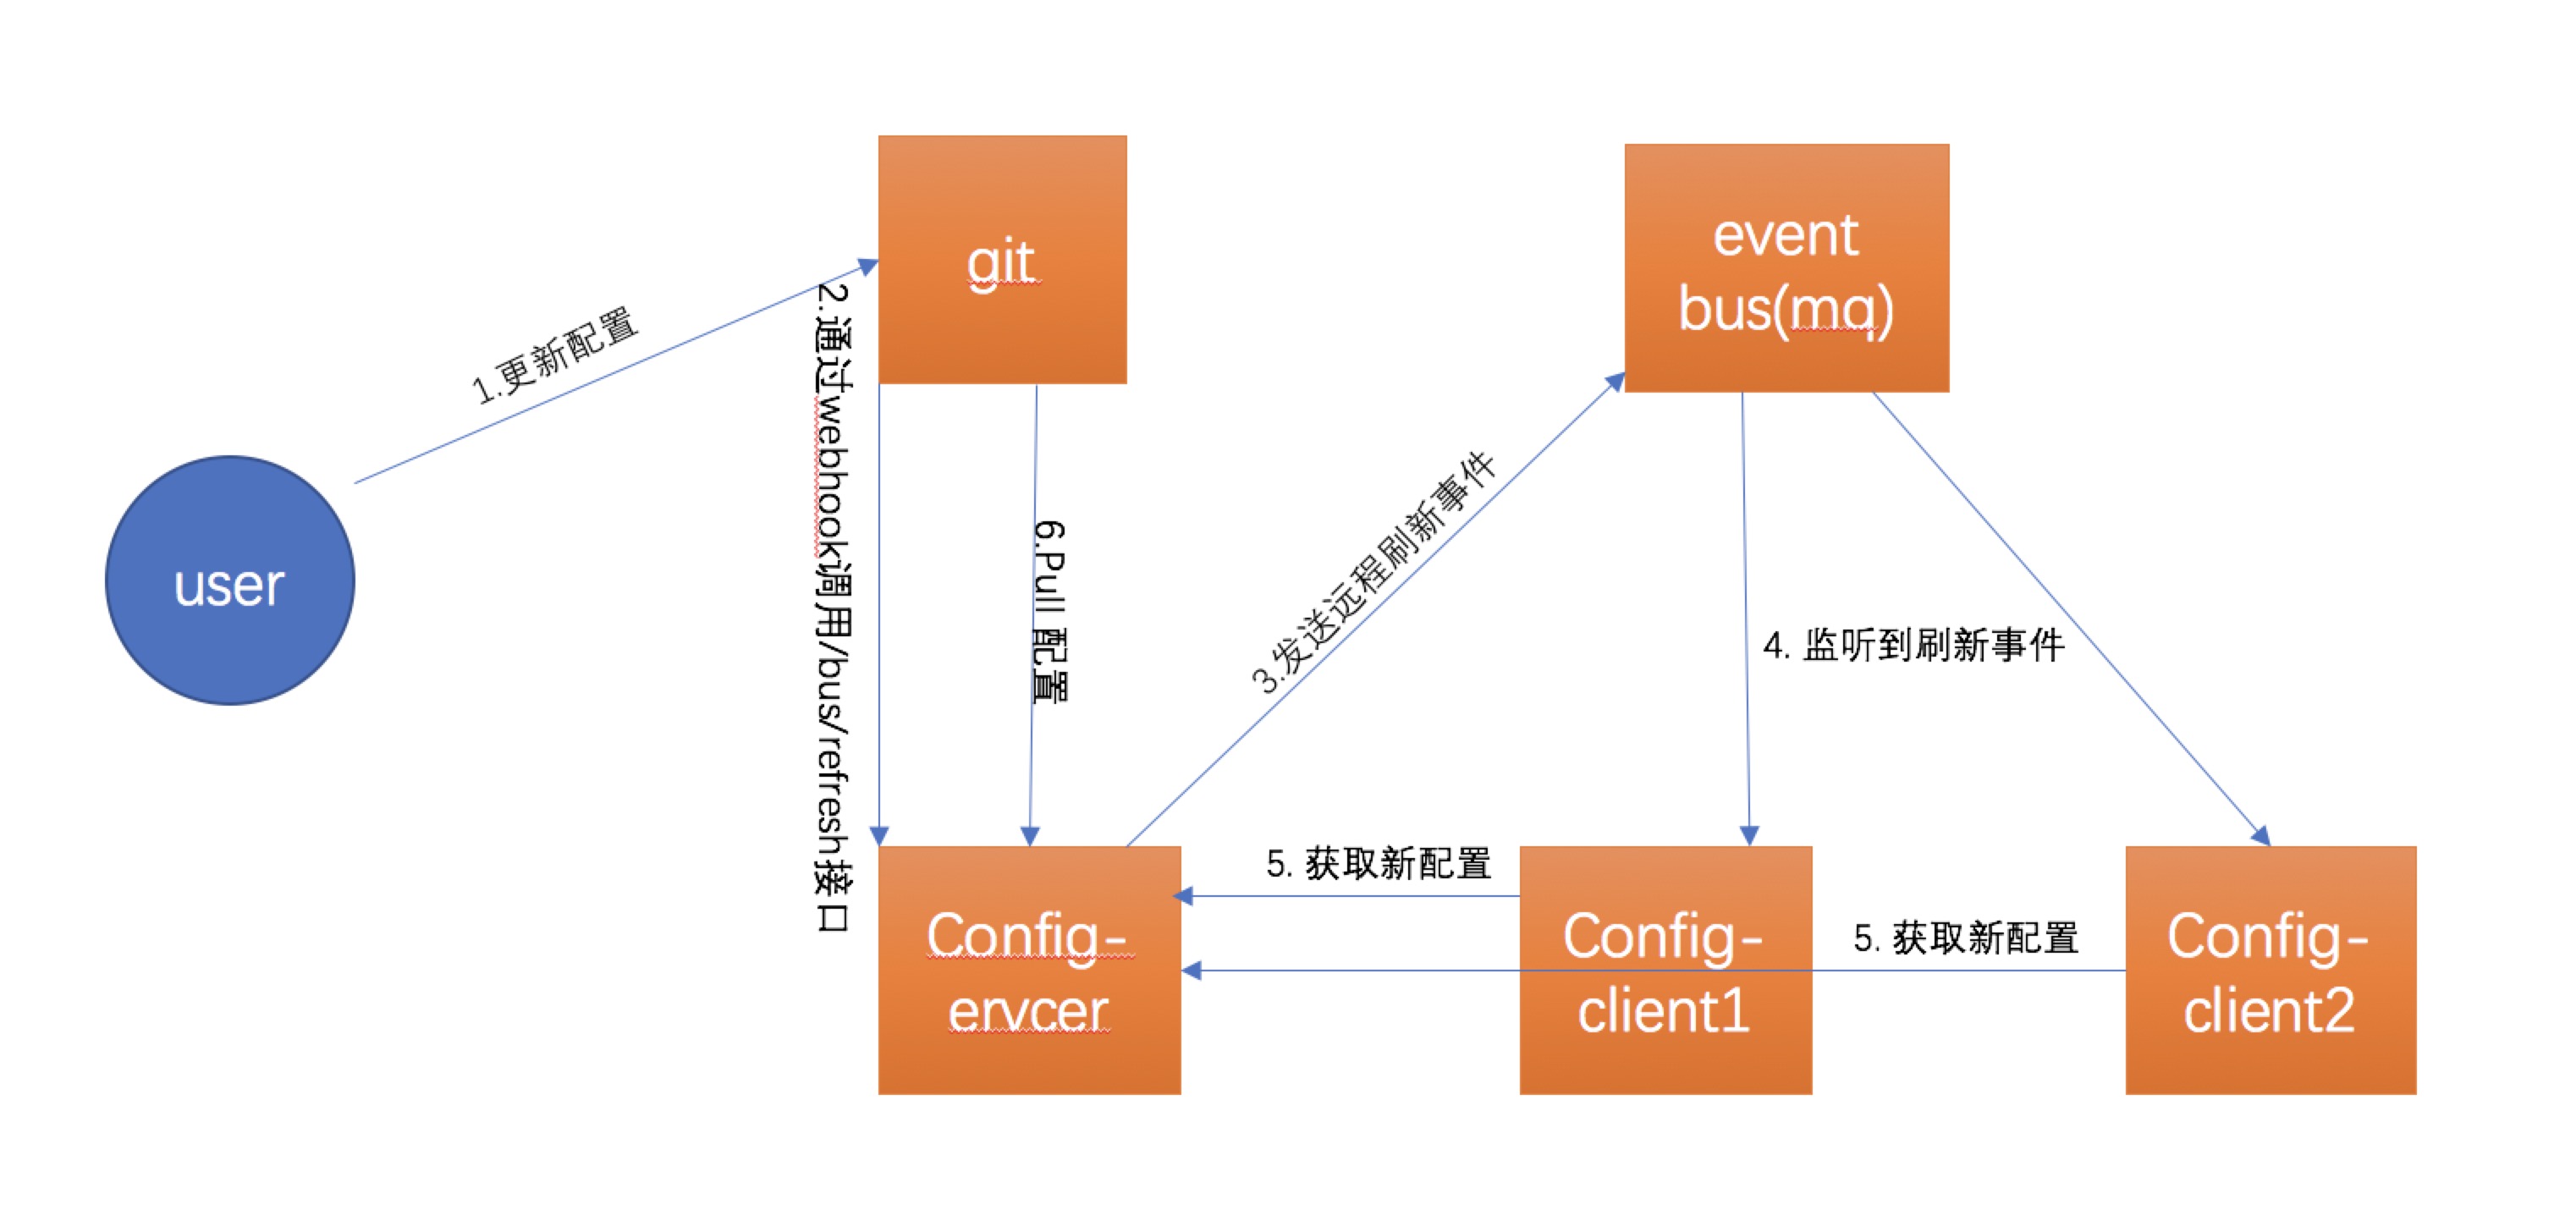
这里是我做的demo,使用了rabbitmq来做消息队列.
源码
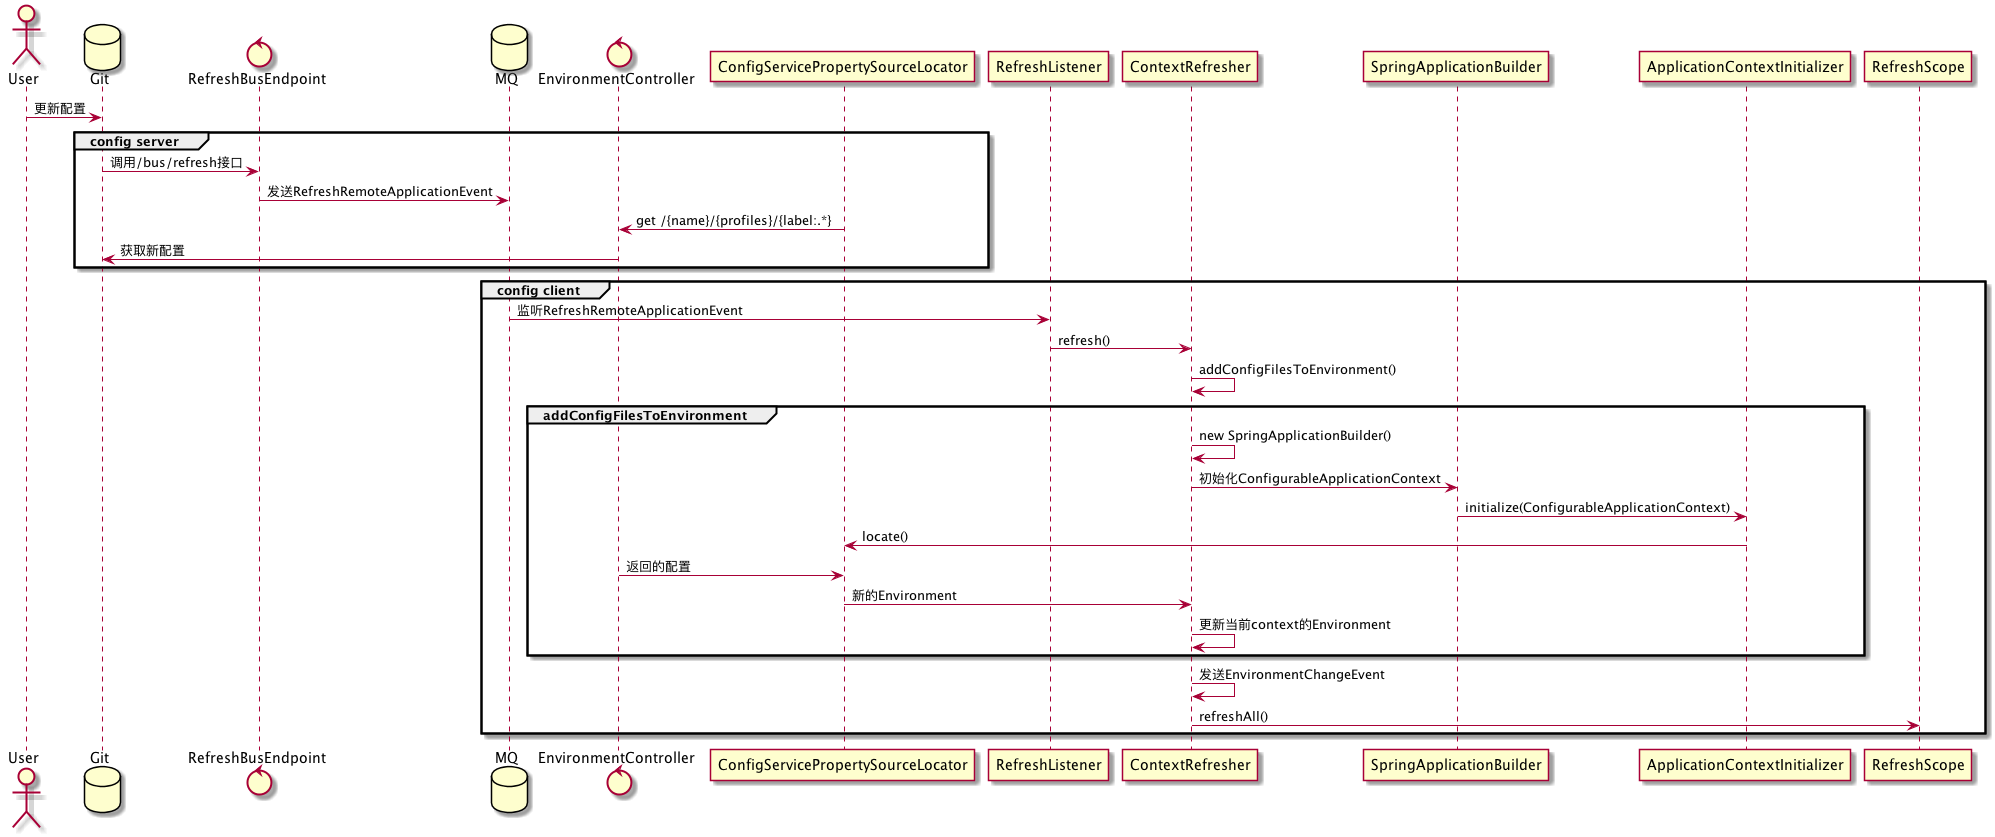
config server
由上图可知当更新配置之后git会通过webhook调用/bus/refresh接口。 这是自动刷新配置的入口,代码如下:
@ManagedResource
public class RefreshBusEndpoint extends AbstractBusEndpoint {
	//省略部分不重要代码

	@RequestMapping(value = "refresh", method = RequestMethod.POST)
	@ResponseBody
	@ManagedOperation
	public void refresh(
			@RequestParam(value = "destination", required = false) String destination) {
		publish(new RefreshRemoteApplicationEvent(this, getInstanceId(), destination));
	}
}
当调用了该接口时,会发送一个RefreshRemoteApplicationEvent事件。config server和config client都监听了该事件(也就是说config server也是可以刷新配置的)。
config client
事件的监听:
public class RefreshListener implements ApplicationListener<RefreshRemoteApplicationEvent> {
    //省略部分不重要代码
	@Override
	public void onApplicationEvent(RefreshRemoteApplicationEvent event) {
		Set<String> keys = contextRefresher.refresh();
		log.info("Received remote refresh request. Keys refreshed " + keys);
	}
}
当发生RefreshRemoteApplicationEvent事件时会调用ContextRefresher的refresh()方法.该方法的主要内容如下
public synchronized Set<String> refresh() {
    Map<String, Object> before = extract(
            this.context.getEnvironment().getPropertySources());
    addConfigFilesToEnvironment();
    Set<String> keys = changes(before,
            extract(this.context.getEnvironment().getPropertySources())).keySet();
    this.context.publishEvent(new EnvironmentChangeEvent(keys));
    this.scope.refreshAll();
    return keys;
}
- 从上下文指定的环境(对应profile)中的所有配置资源中提取配置(除了standardSources之外的配置)
private Set<String> standardSources = new HashSet<>(
            Arrays.asList(StandardEnvironment.SYSTEM_PROPERTIES_PROPERTY_SOURCE_NAME,
                    StandardEnvironment.SYSTEM_ENVIRONMENT_PROPERTY_SOURCE_NAME,
                    StandardServletEnvironment.JNDI_PROPERTY_SOURCE_NAME,
                    StandardServletEnvironment.SERVLET_CONFIG_PROPERTY_SOURCE_NAME,
                    StandardServletEnvironment.SERVLET_CONTEXT_PROPERTY_SOURCE_NAME));
- 添加配置文件到Environment(这一步比较重要需要细聊,下一小结详解)
- 发送一个EnvironmentChangeEvent事件
- 刷新当前context的scope
添加配置到Environment的细节实现
ConfigurableApplicationContext addConfigFilesToEnvironment() {
        ConfigurableApplicationContext capture = null;
        try {
            //拷贝环境
            StandardEnvironment environment = copyEnvironment(
                    this.context.getEnvironment());
            //1
            SpringApplicationBuilder builder = new SpringApplicationBuilder(Empty.class)
                    .bannerMode(Mode.OFF).web(false).environment(environment);
            // Just the listeners that affect the environment (e.g. excluding logging
            // listener because it has side effects)
            builder.application()
                    .setListeners(Arrays.asList(new BootstrapApplicationListener(),
                            new ConfigFileApplicationListener()));
            capture = builder.run();
            //2
            if (environment.getPropertySources().contains(REFRESH_ARGS_PROPERTY_SOURCE)) {
                environment.getPropertySources().remove(REFRESH_ARGS_PROPERTY_SOURCE);
            }
            MutablePropertySources target = this.context.getEnvironment()
                    .getPropertySources();
            String targetName = null;
            for (PropertySource<?> source : environment.getPropertySources()) {
                String name = source.getName();
                if (target.contains(name)) {
                    targetName = name;
                }
                if (!this.standardSources.contains(name)) {
                    if (target.contains(name)) {
                        target.replace(name, source);
                    }
                    else {
                        if (targetName != null) {
                            target.addAfter(targetName, source);
                        }
                        else {
                            // targetName was null so we are at the start of the list
                            target.addFirst(source);
                            targetName = name;
                        }
                    }
                }
            }
            //3
        }
        finally {
            ConfigurableApplicationContext closeable = capture;
            while (closeable != null) {
                try {
                    closeable.close();
                }
                catch (Exception e) {
                    // Ignore;
                }
                if (closeable.getParent() instanceof ConfigurableApplicationContext) {
                    closeable = (ConfigurableApplicationContext) closeable.getParent();
                }
                else {
                    break;
                }
            }
        }
        return capture;
    }
- 拷贝环境(只是从main环境中拷贝默认配置源和profile)
从注释1到注释2之间发生了很有意思的事(实在不知道说什么好):
- 首先他会创建一个新的SpringApplicationBuild出来
- 然后通过build.run()方法创建一个新的ConfigurableApplicationContext出来
为何这么做呢?这又涉及到另外一个类:PropertySourceBootstrapConfiguration,先看下这个类实现的接口:
public class PropertySourceBootstrapConfiguration implements
        ApplicationContextInitializer<ConfigurableApplicationContext>, Ordered
由于他实现了ApplicationContextInitializer
接口,所以当ConfigurableApplicationContext初始化时会调用它的public void initialize(ConfigurableApplicationContext applicationContext)方法: public void initialize(ConfigurableApplicationContext applicationContext) { CompositePropertySource composite = new CompositePropertySource( BOOTSTRAP_PROPERTY_SOURCE_NAME); AnnotationAwareOrderComparator.sort(this.propertySourceLocators); boolean empty = true; ConfigurableEnvironment environment = applicationContext.getEnvironment(); for (PropertySourceLocator locator : this.propertySourceLocators) { PropertySource<?> source = null; source = locator.locate(environment); if (source == null) { continue; } logger.info("Located property source: " + source); composite.addPropertySource(source); empty = false; } //省略部分代码 }最重要的一步是locator.locate(environment),该方法如下(ConfigServicePropertySourceLocator类):
@Override
    @Retryable(interceptor = "configServerRetryInterceptor")
    public org.springframework.core.env.PropertySource<?> locate(
            org.springframework.core.env.Environment environment) {
        ConfigClientProperties properties = this.defaultProperties.override(environment);
        CompositePropertySource composite = new CompositePropertySource("configService");
        RestTemplate restTemplate = this.restTemplate == null ? getSecureRestTemplate(properties)
                : this.restTemplate;
        Exception error = null;
        String errorBody = null;
        logger.info("Fetching config from server at: " + properties.getRawUri());
        try {
            String[] labels = new String[] { "" };
            if (StringUtils.hasText(properties.getLabel())) {
                labels = StringUtils.commaDelimitedListToStringArray(properties.getLabel());
            }

            String state = ConfigClientStateHolder.getState();

            // Try all the labels until one works
            for (String label : labels) {
                Environment result = getRemoteEnvironment(restTemplate,
                        properties, label.trim(), state);
//省略不重要的代码
}
该方法主要是从远程获取Environment(其实际就是发送了个rest request到config server),因为该方法不允许失败,所以还添加@Retryable注解(在失败时重试) 1. 从注释2到3主要是将从远程获取的Environment和当前上下文的Environment做比较,当前Environment有的属性就替换,没有的就新增到当前的Environment中 1. 最后需要close掉新建出来的ConfigurableApplicationContext。
总结一下: config client为了能去远程获取Environment,创建了一个ConfigurableApplicationContext,用来触发ConfigServicePropertySourceLocator的locate方法,随后将新的配置更新到当前环境中,并关闭ConfigurableApplicationContext。
处理EnvironmentChangeEvent事件
ConfigurationPropertiesRebinder:
@Override
public void onApplicationEvent(EnvironmentChangeEvent event) {
rebind();
}
@ManagedOperation
public void rebind() {
this.errors.clear();
for (String name : this.beans.getBeanNames()) {
    rebind(name);
}
}

@ManagedOperation
public boolean rebind(String name) {
if (!this.beans.getBeanNames().contains(name)) {
    return false;
}
if (this.applicationContext != null) {
    try {
        Object bean = this.applicationContext.getBean(name);
        if (AopUtils.isCglibProxy(bean)) {
            bean = getTargetObject(bean);
        }
        this.binder.postProcessBeforeInitialization(bean, name);
        this.applicationContext.getAutowireCapableBeanFactory()
                .initializeBean(bean, name);
        return true;
    }
    catch (RuntimeException e) {
        this.errors.put(name, e);
        throw e;
    }
}
return false;
}
当发生EnvironmentChangeEvent事件时会重新初始化bean(包括重新绑定新的配置源以及重新校验metadata等,详情请查看spring core的官方文档)
scope刷新
RefreshScope:
public void refreshAll() {
    super.destroy();
    this.context.publishEvent(new RefreshScopeRefreshedEvent());
}
由于之前的bean重新初始化了,所以这里需要调用GenericScope的destroy().该方法会调用注册在BeanFactory中的bean destroy回调方法。
然后发送一个RefreshScopeRefreshedEvent事件。RefreshScopeRefreshedEvent事件的监听处理如下(EurekaDiscoveryClientConfiguration类):
@EventListener(RefreshScopeRefreshedEvent.class)
public void onApplicationEvent(RefreshScopeRefreshedEvent event) {
    //This will force the creation of the EurkaClient bean if not already created
    //to make sure the client will be reregistered after a refresh event
    if(eurekaClient != null) {
        eurekaClient.getApplications();
    }
    if (autoRegistration != null) {
        // register in case meta data changed
        this.autoRegistration.stop();
        this.autoRegistration.start();
    }
}
每当metadata发生变化就需要重新在eureka注册,实际上只要调用了/bus/refresh接口就会执行这一步骤。
由于调用了/bus/refresh接口就会触发RefreshRemoteApplicationEvent事件,并且config server和 config client都会监听该事件,而且该事件的处理是不管配置是否更新是否不是该微服务所需要的(即全量的)的都会执行scope的刷新 .所以只要你微服务使用了config的动态刷新,那么当任何一项配置更新时,你所有微服务都会在eureka中重新注册. 然后eureka的服务发现也是全量更新和读取的。然后你懂的。。。。。。